Friday, May 28, 2021

How To Shrink The Hard Disk Partition In Windows


Shrinks the volume with focus to create unallocated space. No data loss occurs. If the partition includes unmovable files (such as the page file or the shadow copy storage area), the volume will shrink to the point where the unmovable files are located.

By shrinking the existing drives or volumes by using the in-built shrinking feature through Disk Management, the user can create a new drive or volume to place their important data or information separately. The user can also use the newly-created drive or volume to keep backup system files and to use multiple operating systems.


Step 1:Open Run Menu by using short cut keys (Window Key+R) & type diskmgmt.msc.

Then click on OK tab.


Step2: To shrink the particular disk partition you want, select it and then right-click on it and select "shrink volume".

After clicking on the "shrink volume" option, "Shrink E:" Window will appear on the screen. Just enter the amount of space you want to shrink in MB and click on the Shrink button.
 

Enter the Size of disk which you want to shrink.


After shrinking Volume, Space will show in unallocated partition, so that you can create new partition.


Thursday, May 27, 2021

5 Ways to Open Disk Management Tool in Windows

Disk Management in Computer Management

Disk management tools are utility software that is used to manage data on disk by performing various functions on it. Moreover, they perform functions like partitioning devices, manage drives, disk checking, disk formatting, etc. 


Way 1: Open Disk Management in Computer Management.

Right-click This PC and choose Manage in the context menu.


Select Disk Management on the left.

Way 2: Access Disk Management via Run.

Use Windows+R to open Run,

 type diskmgmt.msc in the empty box and tap OK

Way 3: Open Disk Management via Command Prompt.
Step 2: Type diskmgmt and press Enter.

Way 4: Turn it on via Windows PowerShell.
Step 1: Open Windows PowerShell via searching.
Step 2: Enter diskmgmt and hit Enter.

Way 5: Turn it on via Windows PowerShell.
Open Control Panal by simple type in search box.
Click on Administrative tools.
Then we can use Computer Management tool for manage disk.

Click on Administrative Tools


Thanks.....


Retrieve stored passwords from your Chrome browser.


 Internet browsers have the ability to save passwords. These are typically kept in a non-encrypted, plain text format.  It is strongly recommended that you do not use your browser's password saving feature as it is not a secure password manager.


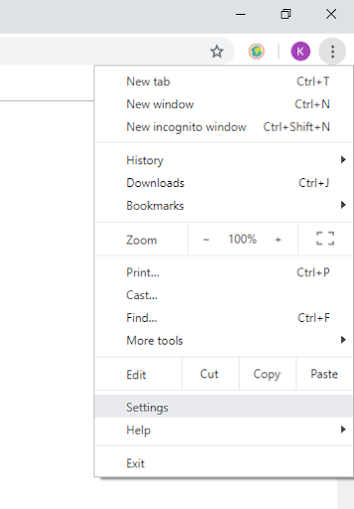
1. Go to settings option using three dot on the top right corner.

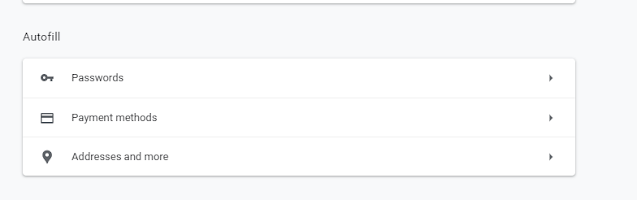
2.Under the Autofill section, select Passwords. In this menu, you can see all your saved passwords.


3.To view a password, click on the show password button (eyeball image). You will need to enter your computer password.


Sunday, May 23, 2021

Make Bootable USB for windows & Linux with Rufus.

 Hello Friends,


Another best application for make Windows or Linux bootable pendrive is Rufus.

You can Easily download from below mention link or simly google it with word "rufus" & use.

https://rufus.ie/en_US/


After Download Run Rufus Utility & You can make bootable USB after simple Selection of your Pendrive & your desired image like Windows 7, Windows 10 or Linux...

Thanks....


How to Create Sinlge & Multi Bootable USB????


Hello friends,

In this article i explaining easy way to make bootable USB with WinToFlash

We can use WInToFlash for single & Multiboot

Win to Flash

Guide on How to Install Novicorp WinToFlash Lite
1) Download Novicorp WinToFlash Lite.
2) Install the Novicorp WinToFlash Lite by following the processes below.
3) Run the installer, Select location to install the program and Click on Next.

4) After downloading, run setup & follow installation instructions with click & finish. USB both... Like Windows 7, Windows 10 or with both windows multi boot USB with single pendrive.


5)The Novicorp WinToFlash Lite Welcome Screen will open after installation as below screen showing, Click on Next.

 6) Check I accept EULA (End User License Agreement) and Click on Next.


7) Then you select the form of licence, either paid or free, if you do not have a license, Select Free License and Click on Next and the Key File will be installed.

1) Launch the Program (Novicorp WinToFlash Lite)
If you have a CD of the OS, Folder with the OS, or extracted version of the OS, Select the first option OR If you have an ISO Image or an archive file(Zip, RAR, DMG etc.), select the second option. Then Click on Next.

 Make sure you insert the USB device you want to make bootable and on the Windows File Path, Go the location of the Windows OS and select it.


8) Then it will go the window, Ready to start and it will show you all the options you have selected, Click on Next.


9) It will then show you the window for the License agreement, Check I do accept the terms of the license and click on Continue.


After presee continue button booting process will start....

Enjoy!!!

Any doubt! Call me at 9956968444


Sunday, June 7, 2020

Saturday, May 9, 2020

Group Management in Linux


Group Management in Linux (CentOS7 /MINT RHEL7)


What is Group in Linux?
In Linux, a group is a collection of users. The main purpose of the groups is to define a set of privileges like read, write, or execute permission for a given resource that can be shared among the users within the group. Users can be added to an existing group to utilize the privileges it grants.
When first time user account is created, a group with the same name is created.
By default created group with user
Other users can be added to the group later.
The primary purpose of groups is to define a set of privileges such as reading, writing, or executing permission for a given resource that can be shared among the users within the group.
There are two types of groups in Linux operating systems:
·         Primary group – When a user creates a file, the file’s group is set to the user’s primary group. Usually, the name of the group is the same as the name of the user. The information about the user’s primary group is stored in the /etc/passwd file.
·         Secondary or supplementary group - Useful when you want to grant certain file permissions to a set of users who are members of the group. For example, if you add a specific user to the docker group, the user will inherit the access rights from the group, and be able to run docker commands.
·          
·         Add a New Group


Displaying the groups an user is a member of
After adding the user to a supplementary group, you can verify that it now actually belongs to such group(s):
# groups [username]
# id [username]

How to Add an Existing User to a Group

To add an existing user to a secondary group, use the usermod -a -G command followed the name of the group and the user:
sudo usermod -a -G groupname username

How to Add an Existing User to Multiple Groups in One Command

If you want to add an existing user to multiple secondary groups in one command, use the usermod command followed by the -G option name of the group separated by , (commas):
sudo usermod -a -G group1,group2 username

How to Change a User’s Primary Group

To change a user primary group, use the usermod command followed by the -g option:
sudo usermod -g groupname username


  Deleting a group
To delete a group, you’ll want to use groupdel,
# groupdel [group_name]


How to Create a New User and Assign Groups in One Command

The following useradd command creates a new user named nathan with primary group users and secondary groups wheel and developers.
sudo useradd -g users -G wheel,developers nathan


Thursday, May 7, 2020

Crearing Users & Group in CentOS7 /RHEL

What is User?

Group is an object which is used to access computer resources (like file, directory and printer etc)

Types of User Accounts in Linux

  Default user in linux operating system
  most powerful
2) System User-
        Create by any application like Appache user create during appache server installation.
3) Normal User($)
  Create by root users with limited access rights
Permission with normal user rights user can work in linux operation system.
This user only create or delete by root user.
Step-1) Open terminal and type su command for access root user session (#).

Step-2) Type command as below mention
              #useradd username.

Step-3 Check whether the user is created using with /etc/passwd file

             #cat /etc/passwd

Note it RepresentUser1-USernamex-Password
1003-UID1003-GUID/home/user1-User1 horme directory/bin/bash-Shell


Sunday, August 25, 2019

Convert an IP Address from Decimal to Binary Form

Decimal to binary conversion is an important task to understand in IP addressing and Subnetting.

Having a good, solid understanding of the simple things makes more complex tasks easier.                 

Here are steps on how to convert a decimal IP address to its binary form:
th bit7th bit6th bit5th bit4th bit3rd bit2nd bit1st bit
128 (27)64 (26)32 (25)16 (24)8 (23)4 (22)2 (21)1 (20)

The first, and probably most important step, is to put down this row of values:  
1286432168421
  1. We take the IP address: 154.31.16.13 and start with the first part, which is 154.
    1. Question: Can I subtract 128 from 154? Answer: YES. So we assign 1 to 128.  
      1286432168421
      1       
    2. Question: Can I subtract 64 from 26? Answer: NO. So we assign 0 to 64.  
      1286432168421
      10      
    3. Question: Can I subtract 32 from 26? Answer: NO. So we assign 0 to 32.  
      1286432168421
      100     
    4. Question: Can I subtract 16 from 26? Answer: YES. So we assign 1 to 16.  
      1286432168421
      1001    
    5. That will give us a remainder of 10. (26-16=10). Question: Can I subtract 8 from 10? Answer: YES. So we assign 1 to 8.  
      1286432168421
      10011   
    6. That will give us a remainder of 2. (10-8=2). Question: Can I subtract 4 from 2? Answer: NO. So we assign 0 to 4.  
      1286432168421
      100110  
    7. Question: can I subtract 2 from 2? Answer: YES. So we assign 1 to 2.  
      1286432168421
      1001101 
    8. That will give us a remainder of 0. So for the rest of the values in our row, we can assign 0.  
      1286432168421
      10011010
      So now we know that a decimal number 154 is 10011010 converted to binary form. To double check, we take the values assigned with 1 and add them together: 128+16+8+2=154  
  2. Our next number in the IP address is: 31. So we start with a question from step 2 again
    1. Can I subtract 128 from 31?  
      1286432168421
      0       
    2. Can I subtract 64 from 31?  
      1286432168421
      00      
    3. Can I subtract 32 from 31?  
      1286432168421
      000     
    4. Can I subtract 16 from 31?  
      1286432168421
      0001    
    5. Can I subtract 8 from 15 (remember, it’s the remainder)?  
      1286432168421
      00011   
    6. Can I subtract 4 from 7?  
      1286432168421
      000111  
    7. Can I subtract 2 from 3?  
      1286432168421
      0001111 
    8. Can I subtract 1 from 1?  
      1286432168421
      00011111
      So the decimal number 31 is 00011111 converted to binary form. To double check: 16+8+4+2+1=31
  3. Next number is 16. I will perform the conversion in one step now.  
    1286432168421
    00010000
    So the decimal number 16 is 00010000 converted to binary form.  
  4. Next number is 13.  
    1286432168421
    00001101
    So the decimal number 13 is 00001101 in binary form. To double check: 8+4+1=13
So the IP address of 154.31.16.13 has its binary form equivalent of:
10011010.00011111.00010000.00001101